
Brownie Badge Work
The Bugs badge has 5 steps, and is designed to help girls learn about bugs, and immerse themselves in the world of bugs. Brownies are in 2nd and 3rd grade, and ready to take the world by storm.
 |
| Brownie Legacy Bugs Patch |
Badge Requirements
- Learn about bugs
- Bug craft
- See bugs in action
- Bug homes
- Take a bug field trip
These requirements do not need to be done all at once, or even all in a row. There is a great spreadsheet that will help track these badge requirements if you choose to space them out. You can find the spreadsheet here. The spreadsheet also gives some more great ideas for ways to meet the requirements. You can also edit the entries if you choose to do something different.
If you have the means for it, a trip to a local zoo, or bug house can help complete the entire badge. If this is the route you take, I will note what will complete each requirement.
1. Learn about bugs
 Simply learning about bugs is a pretty broad topic. There are a few great options. If you are at a zoo or bug house, simply attending a talk about bugs or speaking with someone who is a bug expert.
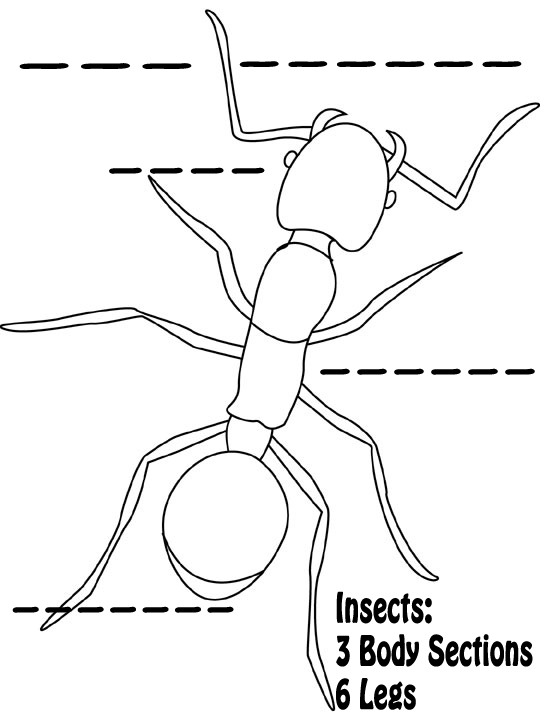
 Another option is to print off bug worksheets here, and hand them out. This is a color sheet of an ant, and has label areas for the 3 main parts of an insect. The title is 'The Insect' and the three sections to label, top to bottom are head, thorax, and abdomen.
Give a short talk about insects: Insects have 3 things in common - 6 legs, 3 body parts, and a hard skeleton. The head is the first part, in front of the thorax. The eyes and mouth are on the head. The thorax is the middle part - sometimes wings are attached to the thorax. The end of the insect is called the abdomen, and it sits right behind the thorax. This is generally the largest part of the insect.
Then have the girls fill in the words, and color in the insect.
 |
| Photo c/o: All Kids Network |
2. Bug craft
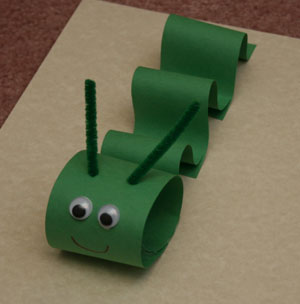
- Paper Inchworm
- Supplies:
- White construction paper
- Green construction paper, printed with this template
- Black sharpie
- Googly eyes
- White glue
- Hole punch
- Black Pipe Cleaner
- Cut on the lines of the green paper. Starting at bottom of white construction paper, glue one end of a green strip down. Glue the other end down, pushing it towards the previously glued end, to form a bump. Repeat this 2 more times to complete the body of the inchworm, overlapping the end of the previous bump each time. Next make a circle with the last strip of paper. Punch two holes in the top and slide one end of pipe cleaner in each hole. Glue 2 googly eyes on the loop, and draw a smile on, then paste it down, overlapping the end of the last strip of the body.
**This craft was inspired by this blog, and has been modified from the original picture to the right.
- Lady Bug roll up
- Supplies:
- Red 2 1/4 in x 6 in strips
- Black 1 in circles, with a tab on one side
- Leaves printed on green construction paper, cut out
- Googly eyes
- Black Sharpie
- White glue
- 6 in pieces of black pipe cleaner
- Make a circle with the red strip (this is the body of your lady bug). Draw black line down the middle, and make 3 black dots on each side. Next, fold tab over on circle, and glue onto the front of red circle (this is the head of your lady bug). Fold pipe cleaner into antennae and glue to black circle. Glue googly eyes on the middle of the black circle, and glue ladybug to your leaf. **This craft was inspired by this blog.
 |
| Picture c/o: Free Kids Crafts |
3. See bugs in action
Challenge your girls to find, and observe at lease 3 types of bugs. Ask them to write 3 sentences about each bug they observe.
At a zoo or bug house, challenge your girls to observe the beehive. They will see bees leaving and coming, and hard at work. You can also challenge them to find the queen, generally marked with a white or black dot on her back.
4. Bug homes
A) Visit a local butterfly home, and check out the chrysalis'. Share with the girls the life cycle of ther Monarch.
Discuss the various homes of the butterfly, as they move through the stages of life. (Leaf or stem, Chrysalis, Warm climate/lots of flowers)
B) Another option is the Simple Bug Hotel. If you are skirmish and your girls are loving this bug badge, this may be for you. You take a 2 liter, and cut the top and bottom off, then cut it in half so you end up with 2 cylinders. Then you stuff the cylinders tight and full of organic material - twigs, leaves, wood, etc. This was a great idea from THIS blog, and she made adorable bug hotels with her kids!
- Female lays an egg, that sticks generally to a leaf or stem
- Egg hatches into a caterpillar
- Caterpillar creates chrysalis
- Butterfly emerges from chrysalis, living the rest of their lives in a warm climate with lots of flowers.
Discuss the various homes of the butterfly, as they move through the stages of life. (Leaf or stem, Chrysalis, Warm climate/lots of flowers)
B) Another option is the Simple Bug Hotel. If you are skirmish and your girls are loving this bug badge, this may be for you. You take a 2 liter, and cut the top and bottom off, then cut it in half so you end up with 2 cylinders. Then you stuff the cylinders tight and full of organic material - twigs, leaves, wood, etc. This was a great idea from THIS blog, and she made adorable bug hotels with her kids!
5. Take a bug field trip
If you are at a zoo or bug house, you've got this one in the bag. Let the girls enjoy their surroundings and take in all the bugs they can find.
Other options are taking a trip to a local farm, state park, or beach, and taking note of your surroundings. Notice bugs on the ground, in the sand, in the water, on trees, etc. Observe them and try to figure out what is happening in their lives.
Other options are taking a trip to a local farm, state park, or beach, and taking note of your surroundings. Notice bugs on the ground, in the sand, in the water, on trees, etc. Observe them and try to figure out what is happening in their lives.


No comments:
Post a Comment
Thanks for commenting!